
French Provincial Couch Makeover
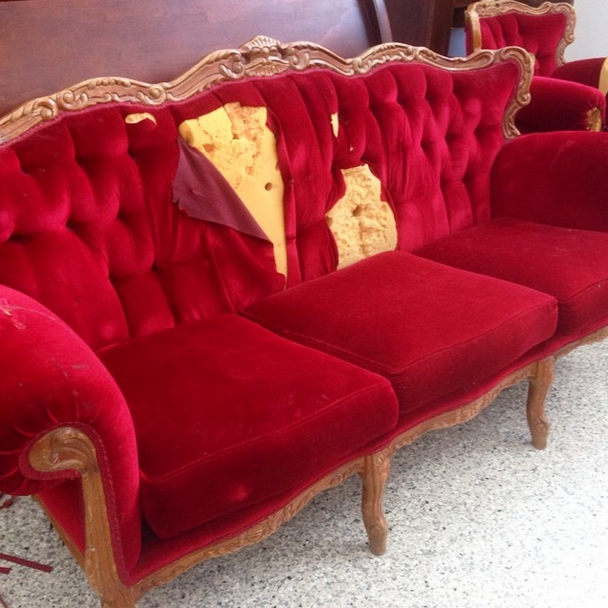
The story of my red velvet, French Provincial style couch began when an Instagram photo popped up on my feed advertising a single seater red velvet armchair for $40 via Virginia Antiques, in Brisbane. I had just dropped the kids to school and it was one of those days where I didn’t have a lot planned apart from coming back home to paint, so I took the drive over to the north side to take a look. The chair was torn on one arm and the foam was damaged a bit, but I couldn’t pass it up. He then showed me this 3 seater he also had in his shed, that he was trying to get rid of – so for a total of $90 for the two chairs I made the call to my husband (my van guy) who picked them up for me.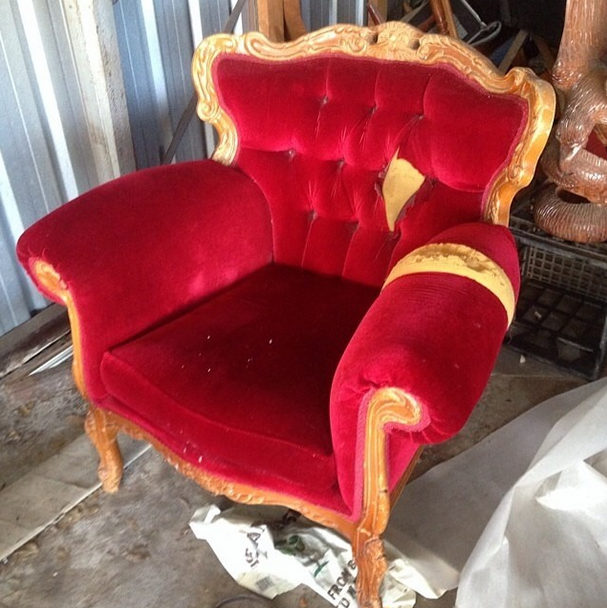
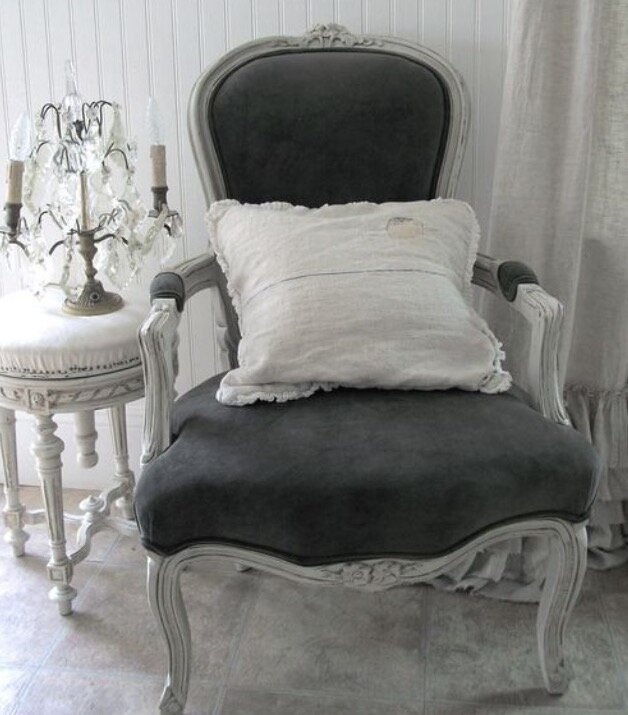
I showed you in my last blog post, these sofas were my inspiration (via Pinterest) as far as colours I wanted to aim for:
I began by removing staples on the single couch – millions of staples … okay, maybe thousands, but this task became all too much every now and then, so big breaks (like days) became normal! I took photos of the way things all fit together, hoping that I’d figure this whole upholstery thing out – what was I thinking?!
Adairs: Biggest Sale Ever on Now! Plus Free Shipping!
I mean, I’ve done a few basic upholstery jobs, but nothing like this – and look at all that tufting! So I called a lady from our church, who I learned, did upholstering, sent her a pic and asked if she was interested in helping me finish my sofas. She loved the ornate detailing of the French Provincial style and loved the idea of the challenge, so basically, she saved my LIFE! LOL.
Meet Shar – she is wonderful – the end.
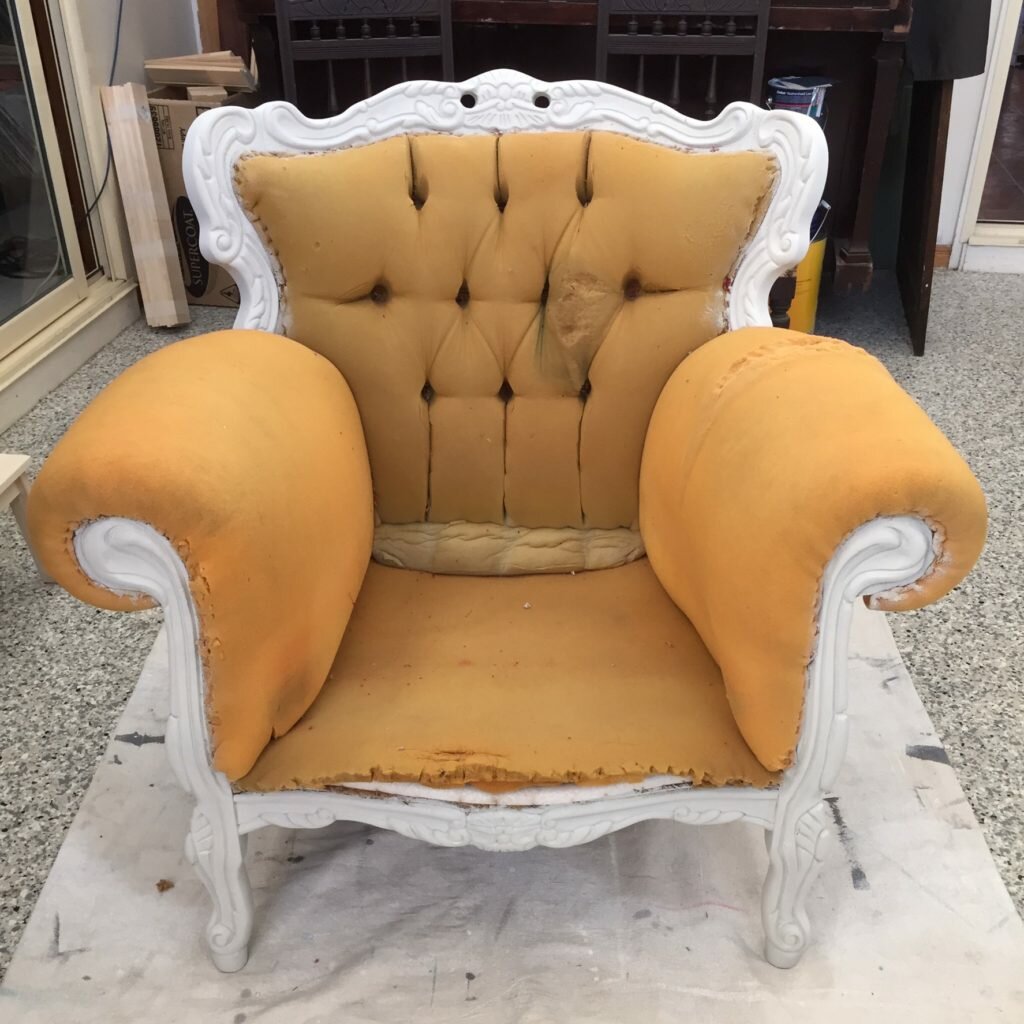
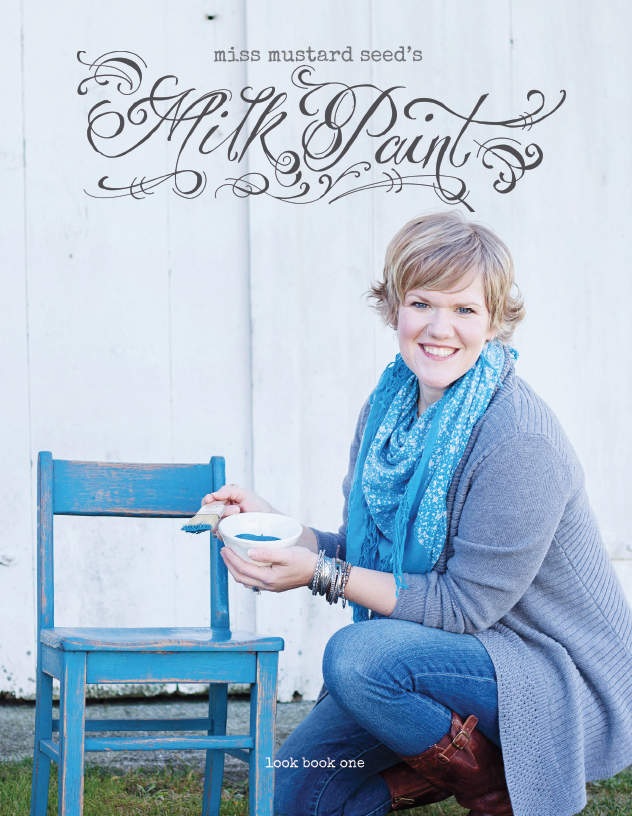
She helped pull out LOTS of staples and here is a pic of her with the single seater after I’d painted the frame in Miss Mustard Seed’s Milk Paint – colour, Grainsack. All ready for Shar to do her upholstery magic. Meanwhile I tackled the 3 seater couch, using Sandi Hands Sanding gloves to easily remove the old varnish which was quite chipped and worn. I didn’t mind a bit of timber showing through after painting, but the sanding prep was important to me to get a nice smooth even finish on the paint work.
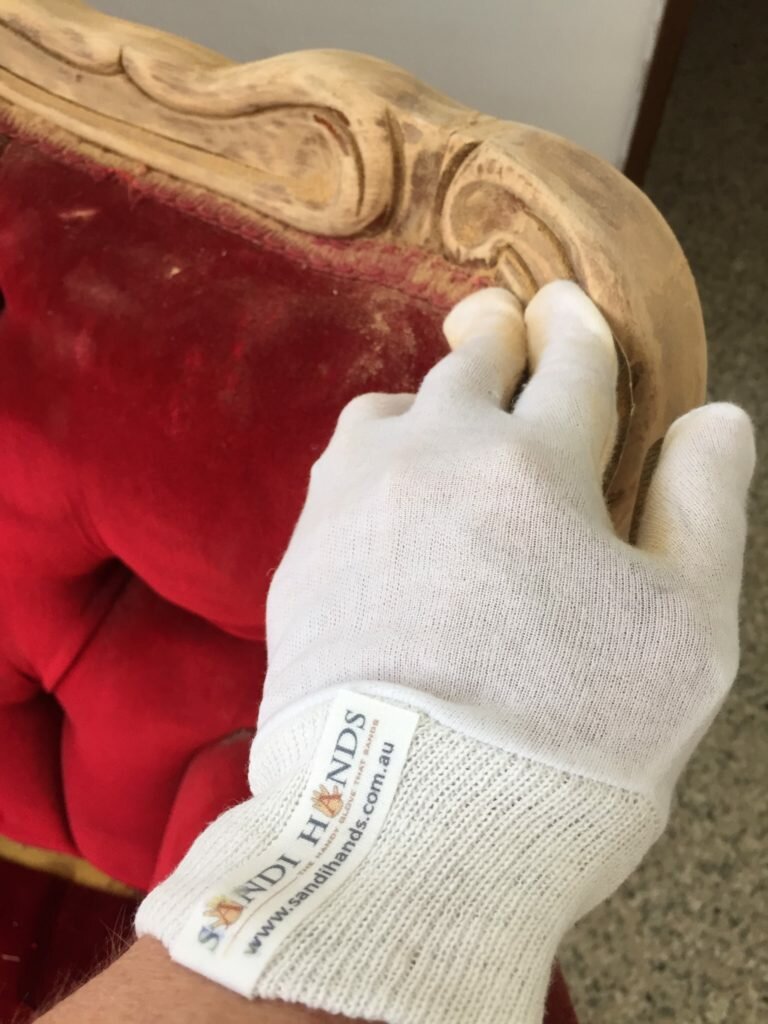 Removing the ‘gimp’ or trim, is the easy part. It is usually just glued on and so came off by just pulling it away from the fabric.
 The staples were, like I said, EVERYWHERE. So these two tools were my best friends: A staple remover (top in pic below) and a pair of pincers (bottom in pic below). These, along with a small screwdriver every now and then to dig under staples that were too far embedded for the staple remover to get under, were my tools of trade for this task.
 We were kind of on a time limit, since my husbands sister and her family (5 of them) were coming over for Christmas and I wanted to try and get this couch done before they came. My mum and sister came over to help me clean one day, and that afternoon I found them digging staples out furiously, and before I knew it, the 3 seater was half done! Champions, they are!
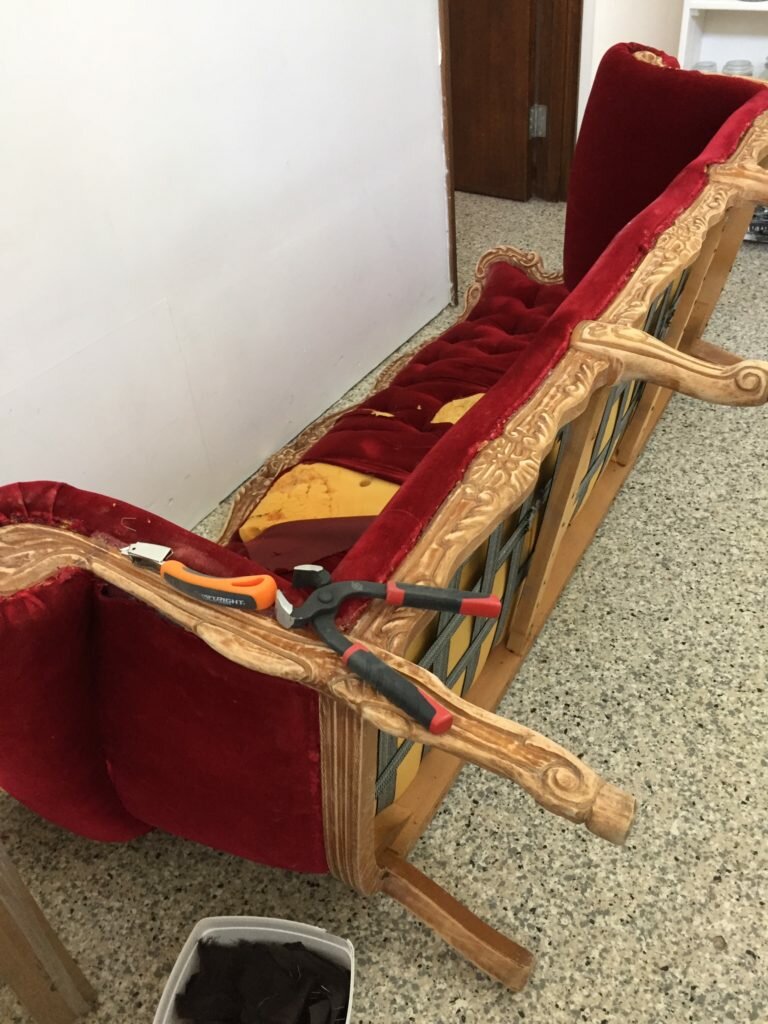 Here is the single seater after two coats of MMSMP Grain Sack, before I sanded back to distress and waxed with Antiquing wax.
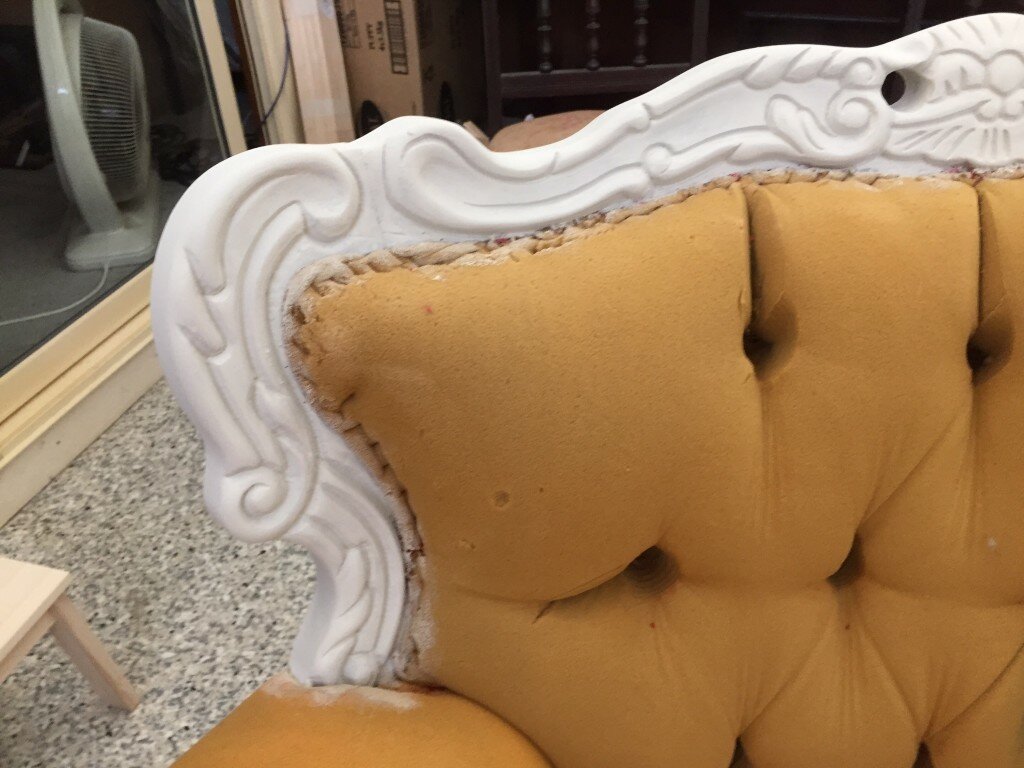
 In the picture below, you can see I have used MMSMP Antiquing Wax to highlight the details on the right hand side, compared to the left side, which has not been waxed yet.
 Here is a close up of the antiquing wax side – just a subtle amount, caught in the crevices, can change the whole look of your piece, highlighting the details.
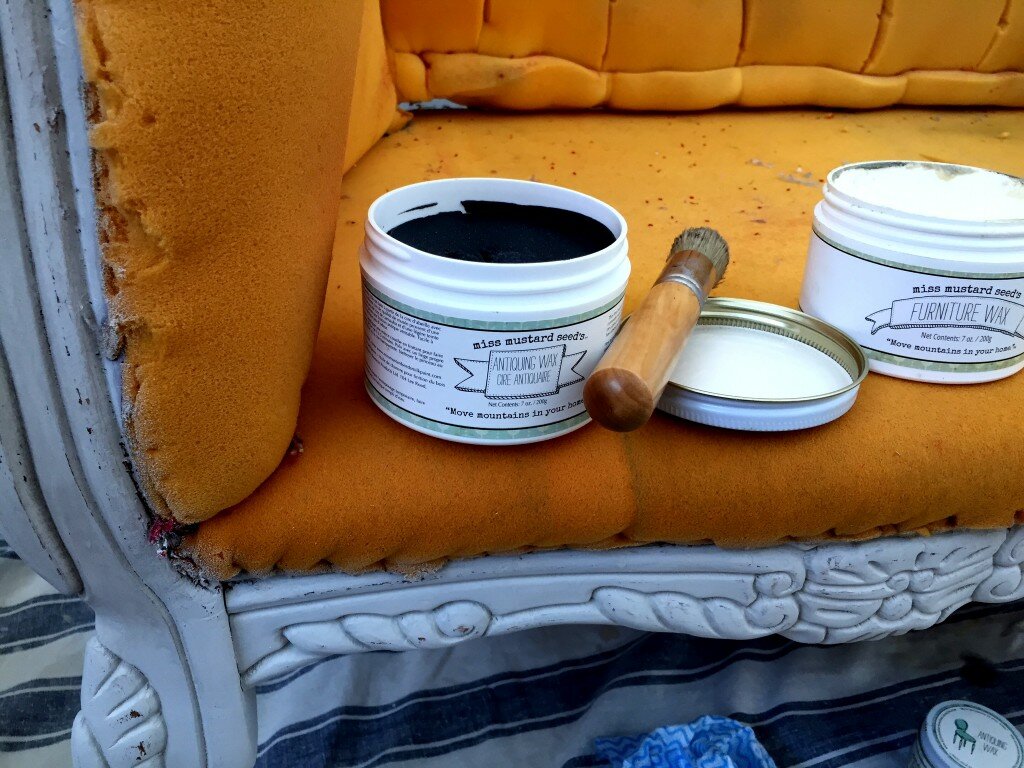
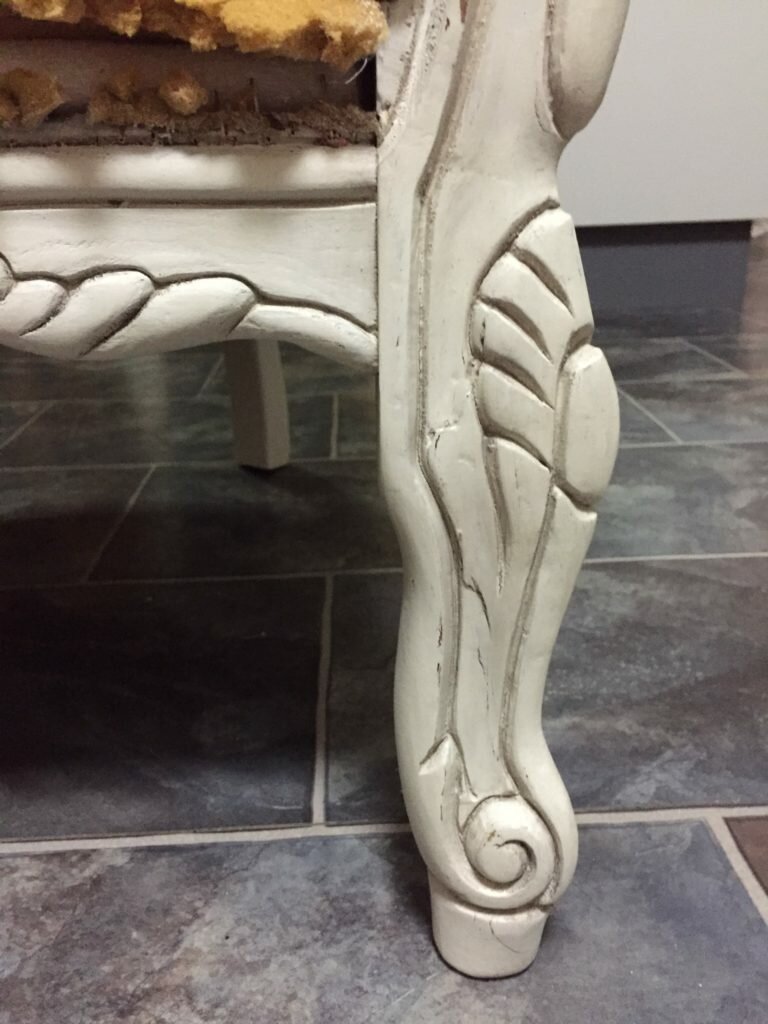 I opened a new jar of Antiquing Wax, and after detailing the whole 3 seater, this is how much I had used, so as you can see, I don’t go overboard. I personally hate wastage.
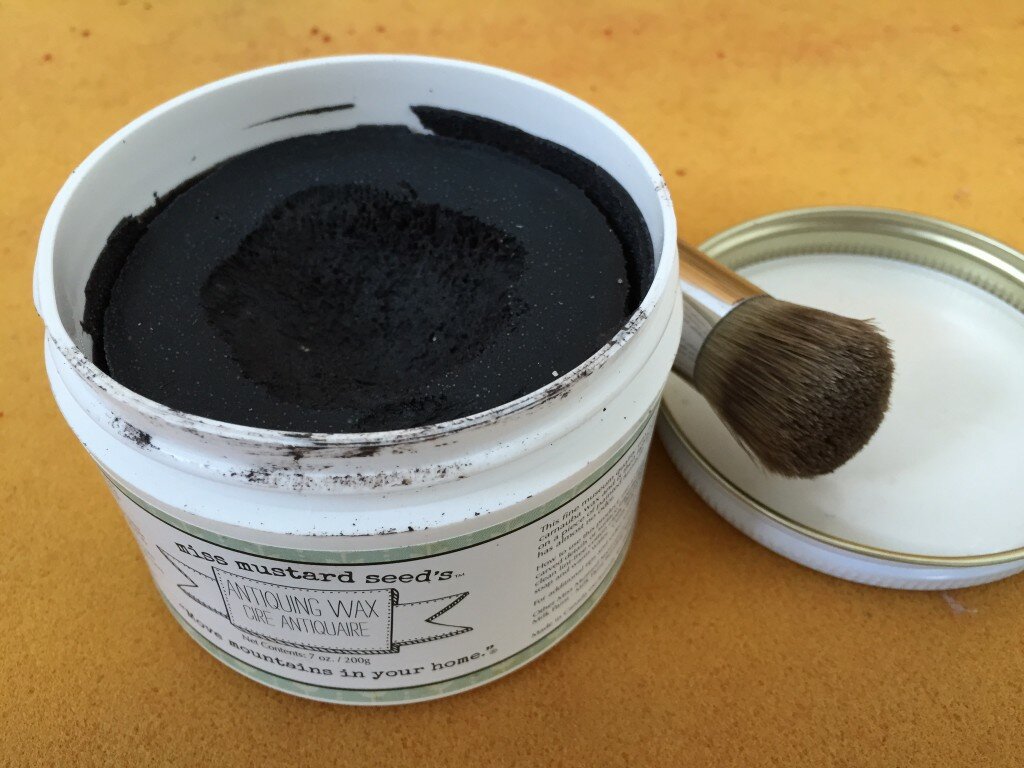 As I went along with the Antiquing Wax, I also used some clear MMSMP Furniture Wax to wipe away the Antiquing Wax from the parts where I didn’t want so much dark and grungy, mostly along the high edges and flat parts, keeping the dark in the grooves.
 Here’s a video below, of how I actually use the Antiquing Wax on this piece of furniture. You can see more video tutorials on my .
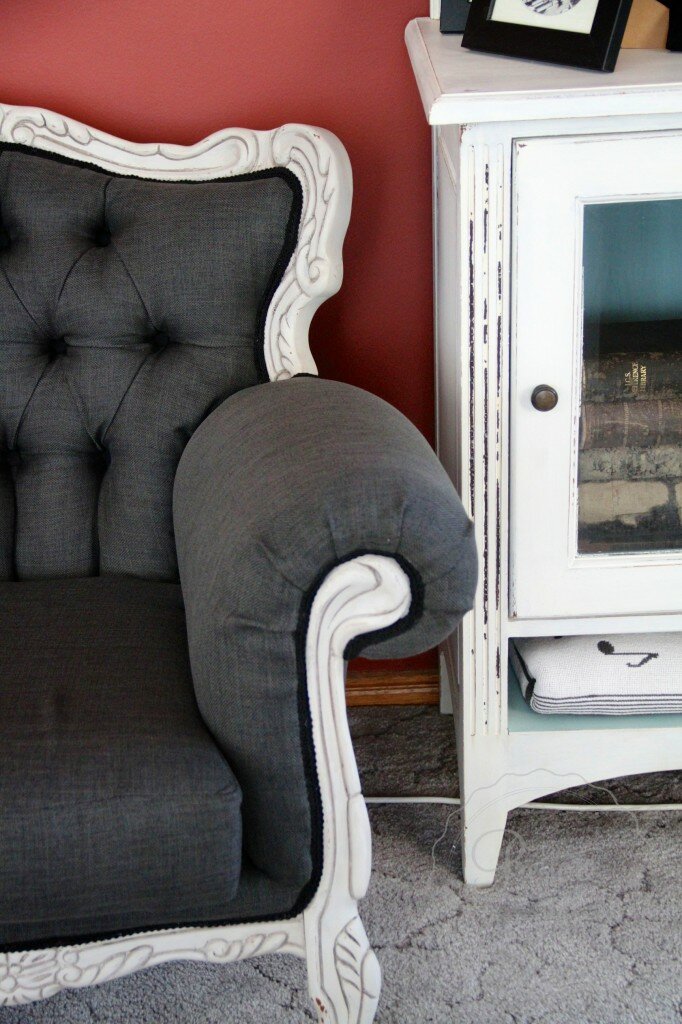
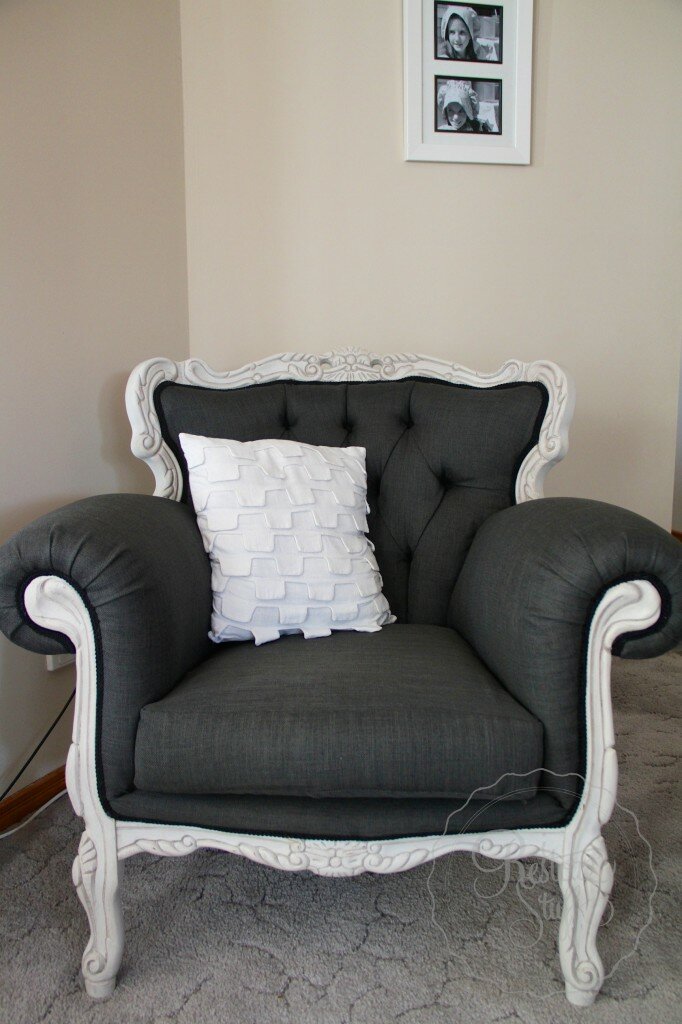
After painting and waxing was finished, I handed over the project to my upholstery expert, who completed the makeover. When picking out fabric, we found a charcoal colour I liked in a fabric she hadn’t used before, but looked as though it might work well, as it was a microfibre type of weave, making it thinner and easier to form around the buttons for the tufting. At the time I went to purchase it, it happened to be on sale! I love it when that happens!
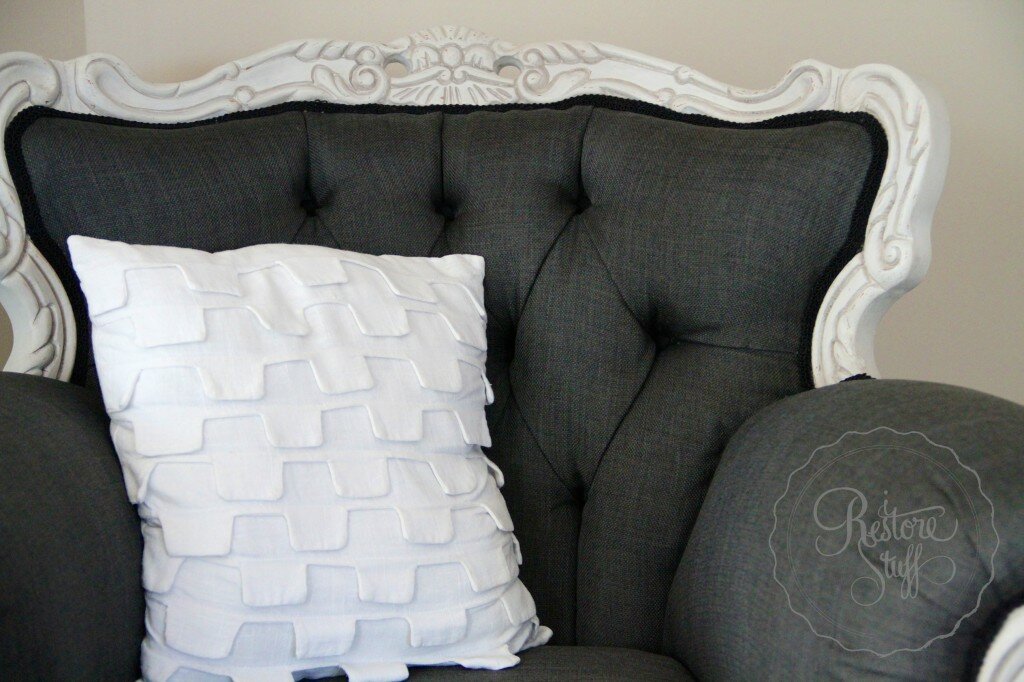
 However, the fabric did turn out to have some limitations. Shar began to work with it to cover the buttons and called me in a panic – the fabric was fraying like crazy and becoming impossible to use for the self covering buttons we were trying to make. AHH, what to do? She suggested using a contrasting black fabric, since we were using a black gimp trim around the edges anyway. I decided that was a good compromise, as the buttons are so deep you really don’t notice them anyway. Shar ended up having to also use a hot knife to sear the edges of the fabric to stop them from fraying as she worked. So keep this in mind if you do choose to use this type of fabric for anything.
But the results are lovely, and here are the finished chairs: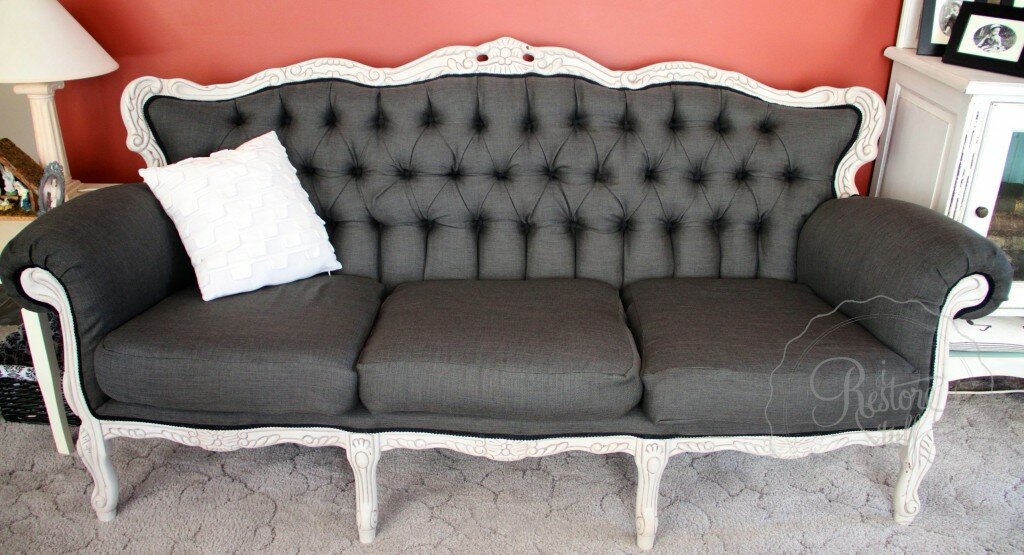


We are authorised retailers for Fusion Mineral Paint and Miss Mustard Seed's Milk Paint in Australia. This blog post may contain affiliate links.

15 Comments
alison
January 5, 2015 at 9:19 pmJust divine! You are amazingly talented!
admin
January 8, 2015 at 9:30 pmThanks Alison, but as I said, so much credit goes to my upholstery friend.
It looks great Sharon. I am also self taught with basic upholstery but was given an upholstery course for Christmas – can’t wait!
I’m also itching to give welding a try so that course is next on my list. 🙂
admin
January 8, 2015 at 9:31 pmGood on you Tracey, that sounds like fun!
Jane
January 5, 2015 at 11:06 pmWow what a huge job! But they turned out looking amazing. Inspiration for finding someone to help out on my upholstery projects. 🙂
admin
January 8, 2015 at 9:32 pmYes, this one was in my “too hard right now” pile!
Victoria Meyers
January 6, 2015 at 12:56 amAbsolutely stunning! Gorgeous Sharon! You did such a wonderful job on these pieces! 🙂
Fiona, Lilyfield Life
January 6, 2015 at 8:02 amIt looks great Sharon, your friend is very clever!
admin
January 8, 2015 at 9:32 pmThanks Fiona, she is indeed.
Hayley
January 6, 2015 at 10:02 amCame up a treat Sharon! Wish I had room for something like that but I have my husbands family Jacobean Suite and no room for another suite. The colours look on your suite great!
Darrielle Tennenbaum
January 6, 2015 at 10:55 amStunners! I think your work paid off!
Danielle Andrew
January 10, 2015 at 3:09 amWow! Those are stunning! Great work!
Karen
March 1, 2015 at 10:23 amHi Sharon,
These came up really well, they look stunning. I’m currently stuck in staple removing hell and was wondering if you could give me more info on your staple remover tool. I am about ready to give up! Any info would be appreciated.
admin
March 1, 2015 at 3:21 pmHi Karen,
Yes, this is the worst part of upholstering. The staple remover I use is a Craftright which I got from Bunnings (Australia) along with the pincers which are Trojan brand. The staple remover helps get under staples and pulls them up. Often older staples snap, so the pincers grip and pull them out with a rolling motion – so much easier than pliers and doesn’t wreck your timber work.
116 Year Old Dining Chairs - Part 2 - Milk Paint Finish
March 17, 2016 at 5:40 pm[…] If you missed Part 1 of my chair makeover last week, I was showing the amazing treasures we found in these antique dining chairs, including newspaper clippings from 1899!! Click HERE to see Part 1 and all the treasures we found. These chairs were riddled with upholstery nails and tacks after the four or more layers of fabric that had covered them. Here’s mum helping me pull some out – she’s a gem!Sanding back the rough, old and chipped frame using my Sandi Hands Sanding gloves.I used Miss Mustard Seed’s Milk Paint in the colour Grain Sack to give these old girls a new lease of life, keeping with an aged appearance. Here they are after two coats of the Grain Sack MMSMP: Here’s where things got a little tricky, but with the help of some youtube tutorials and blog posts, I stapled on the webbing and assembled the springs.Added some seat foam, stapled over some batting … All ready for their new covers… I had also sanded to distress the paint for an authentic antique look.And for the finish over the Grain Sack colour milk paint, I used MMSMP Antiquing Wax to give an aged finish and to seal the paint in.You can see in these close ups, the antiquing wax sits in the grooves and crevices of the wood to define and create shadows and aged patina. I brought my single seater French Provincial chair in for the photo shoot. I matched the fabric with these chairs, which is very similar, but can look different in different lights. You can read about the French Provincial couch makeover HERE. […]