My Aunt & Uncle asked me to restore this old vintage cabinet they have, which came from their family doctor’s surgery. Their doctor had become more of a family friend and a father figure to my Aunty, after seeing them through the birth of all four of their children and growing up with all the regular family doctor visits. They became quite close, and sadly passed away a couple of years ago. So this cabinet holds a lot of sentimental value to my Aunt, and it became somewhat of a random storage place for all sorts of things for the family.
But with recent renovations to their home, including a big kitchen redo, my aunt had found the perfect place to fit her old medical cabinet, and wanted it painted to match the theme going on in the new kitchen.
There were several small repairs that needed to be done before I could begin the painting. I began by removing hinges, and here’s a free tip for you:
When removing hinges on antique furniture, place the hinge in a zip lock bag with its screws and mark where it came from eg. bottom left. I have found that sometimes, it matters, and you don’t want ill fitting cabinet doors when it all goes back together.
Adairs – The Essentials Sale is now on
I did a fair bit of wood glueing and clamping on some parts where hinges had caused wood to split and I used wood putty to bog some holes, including this door edge where some veneer had chipped off. I was worried how this might turn out, but the corner squared off nicely! Here is one coat of the colour they had custom tinted to match the kitchen cabinet laminate that was in the newly renovated kitchen. Its a very pale blue:
 Here is a pic my Aunty sent of their new kitchen cabinets:
 The inside, I painted a charcoal grayish black, which matches in with their counter tops that are similar colour marble effect. I painted inside first, then worked on the outside.
 Looking awesome already …
 Now for a little distressing … using Sandi Hands sanding gloves. They are so good for all sorts of sanding and save your nails and hands from being distressed at the same time!
 I then waxed the entire piece using Miss Mustard Seed’s Furniture Wax, which is so nice and buttery compared to a lot of other furniture waxes I’ve tried.
  I re-assembled the doors and hardware, including some of these new hinge stopper thingy’s (insert proper name here?) as the old ones had broken.
 My Aunty picked out these black knobs and cup pull which complemented the insides nicely.
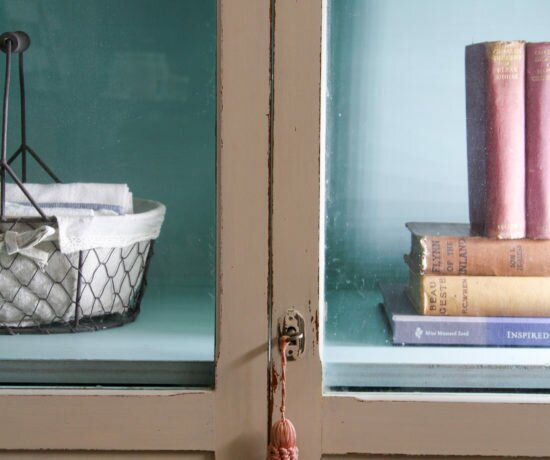
 And here is the finished look:


 I found these old medical books lying around my house, so couldn’t help picking them to use for this photo shoot.
 And of course, some cute medicine bottles to complete the picture, since this was used in a doctor’s surgery at one time in it’s life, it was only fitting.


If you enjoyed reading about this makeover, you may like to look at some more in the suggested posts below.
You can also find tutorials on my youtube channel , or catch up with me on any of the social media icons you see at the top of this blog.
Happy Painting!
We are authorised retailers for Fusion Mineral Paint and Miss Mustard Seed's Milk Paint in Australia. This blog post may contain affiliate links.


No Comments